Airsquire frontend opensource practice
17 Feb 2018
. category:
engineering
.
Comments
#frontend
Summary
This article is continued from Deterministic WYSIWYG driven methodology for Airsquire frontend engineering. It will show a progressively tutorial for how we construct a boilerplate which is used as starter project for all of Airsquire’s frontend open-source project. AirProgressbar is one of the example.
Tech stack
- Typescript
- React
- Enzyme
- Jest
- Storybook
- Tavis CI
Step 1 - Setup for Typescript + React dev env
Start from package.json
The start package.json will define name, version, description, keywords, license. For versioning we are practicing Semantic Versioning 2.0.0.
package.json
{
  "name": "react-typescript-npm-storybook-boilerplate",
  "version": "0.1.0",
  "description": "react typescript npm storybook boilerplate",
  "keywords": ["react", "typescript", "npm", "boilerplate", "storybook"],
  "license": "Apache-2.0"
}
Add dependencies
We recommend to use yarn for deterministic and faster package management.
yarn add react react-dom;
yarn add @types/react @types/react-dom --dev
Add configuration
Then create src/ folder and lib/ for Typescript source and transpiled libary. We also need to config our tsconfig.json for this. Be attention, the delcaration need to be true for generating type defination file in case other people want to use your library in Typescript. The following json file basically configs what shall be transcompiled in which way to which location. PS: Typescript Configuration Doc
tsconfig.json
{
  "compilerOptions": {
    "baseUrl": "./",
    "outDir": "./lib",
    "target": "es6",
    "module": "commonjs",
    "noImplicitAny": false,
    "strictNullChecks": true,
    "removeComments": true,
    "declaration": true,
    "sourceMap": true,
    "jsx": "react"
  },
  "include": ["./src/**/*.tsx", "./src/**/*.ts"],
  "exclude": ["node_modules"]
}
Add implementation
Then we add our implementation file under src/. For the following implementation and test case I will use react-typescript-npm-storybook-boilerplate for example.
src/index.tsx
import * as React from "react";
export interface InterfaceSampleProps {
  sampleName: string;
}
class Sample extends React.Component<InterfaceSampleProps> {
  private static defaultProps = {
    sampleName: "Hello World",
  };
  render() {
    return <div>{this.props.sampleName}</div>;
  }
}
export default Sample;
Then we need to transplile source code to a more commonly used standard like es6 + commonjs. We also need to add build script in package.json
package.json
{
  ...
  "scripts": {
    "build": "rm -rf ./lib && tsc"
  },
  ...
}
Run
Then use npm run build to transpile and you will find 3 files (index.d.ts, index.js, index.s.map) generated under lib/. These are your transpiled component and can be imported by other developers in not only Typescript but also any javascript environment which is compatible with your target standard es6+commonjs.
Attention
Remember to add main and types to your package.json for module resolution. This can be a very tedious problem. PS: Module resolution handbook
package.json
{
 ...
 "main": "lib/index.js",
 "types": "lib/index.d.ts",
 ...
}
Step 2 - Robust from Unit test and Good Coverage
Start from Jest and Enzyme
Before we publish our component to NPM we need to run test locally to ensure this will work. We use Jest, Enzyme.
Add dependencies
yarn add jest enzyme enzyme-adapter-react-16 @types/jest ts-jest typescript --dev
Add configuration
Add configuration for both Jest and test script in package.json. Be attention, we configure jest to consider testcase written in Typescript so need use ts-jest for it.
package.json
{
  ...
  "scripts": {
    "build": "rm -rf ./lib && tsc",
    "test": "jest"
  },
  "jest": {
    "moduleFileExtensions": [
      "ts",
      "tsx",
      "js"
    ],
    "coverageDirectory": "./coverage/",
    "collectCoverage": true,
    "transform": {
      "^.+\\.tsx?$": "ts-jest"
    },
    "testRegex": "/*.test.(ts|tsx|js)$"
  },
  ...
}
Add implementation
Then we create test/ and add index.test.tsx into it. The following code uses Enzyme to util component testing with react.
test/index.test.tsx
import * as Enzyme from "enzyme";
import * as Adapter from "enzyme-adapter-react-16";
Enzyme.configure({ adapter: new Adapter() });
import * as React from "react";
import Sample from "../";

describe("<Sample />", () => {
  it("renders Sample with Hello Airsquire", () => {
    const testDescription = "Hello Airsquire";
    const wrapper = Enzyme.shallow(<Sample sampleName={testDescription} />);
    expect(wrapper.find("div").length).toBe(1);
    expect(wrapper.text()).toBe(testDescription);
  });
});
Run
Then use npm test you will find output like the following in your console and a coverage folder will be generated.
PASS  tests/index.test.tsx
  <Sample />
    ✓ renders Sample with Hello Airsquire (9ms)

----------|----------|----------|----------|----------|-------------------|
File      |  % Stmts | % Branch |  % Funcs |  % Lines | Uncovered Line #s |
----------|----------|----------|----------|----------|-------------------|
All files |      100 |      100 |      100 |      100 |                   |
 index.js |      100 |      100 |      100 |      100 |                   |
----------|----------|----------|----------|----------|-------------------|
Step 3 - Visualise your component documentation
Start from Storybook
After running the unit test we know what expectation the component will achieve. But human is a animal with 2 eyes but only 1 brain (We are visually intensive to sense stuffs). We are using storybook to visually show and document the component
Add dependencies
To be attention, we are using addon-knobs for interactive UI elements. PS: Addon-Knobs Documentation
yarn add storybook @types/storybook__react @storybook/addon-actions @storybook/addon-knobs @storybook/react @types/storybook__react babel-core --dev
Add configuration
In order to use React + Typescript in storybook we need to create custom configuration folder .storybook and add addons.js, config.js, webpack.config.js into it. PS: Custom Webpack for Storybook Documentation.
.storybook/addons.js
import "@storybook/addon-knobs/register";
.storybook/config.js
import { configure } from "@storybook/react";
function loadStories() {
  require("../stories");
}
configure(loadStories, module);
.storybook/webpack.config.js
const genDefaultConfig = require("@storybook/react/dist/server/config/defaults/webpack.config.js");
module.exports = (baseConfig, env) => {
  const config = genDefaultConfig(baseConfig, env);
  config.module.rules.push({
    test: /\.js$/,
    loader: "source-map-loader",
    enforce: "pre",
  });
  config.module.rules.push({
    test: /\.(ts|tsx)$/,
    loader: require.resolve("awesome-typescript-loader"),
  });
  config.resolve.extensions.push(".ts", ".tsx");
  return config;
};
In order to make the above Webpack configuration working we need also to add its dependencies as below. PS: Webpack + Typescript documentation
yarn add awesome-typescript-loader source-map-loader --dev
Then add storybook related script into package.json as below
package.json
{
  ...
  "scripts": {
    "build": "rm -rf ./lib && tsc",
    "test": "jest",
    "storybook": "start-storybook -p 9009"
  },
  ...
}
Add implementation
Then we create stories/ and add index.tsx into it.
stories/index.tsx
import * as React from "react";
import { storiesOf } from "@storybook/react";
import { withKnobs, text } from "@storybook/addon-knobs/react";
import Sample from "../";
const SampleStory = storiesOf("Sample", module);
SampleStory.addDecorator(withKnobs);
SampleStory.add("default", () => {
  const sampleText = text("Label", "Hello Airsquire");
  return <Sample sampleName={sampleText} />;
});
Attention
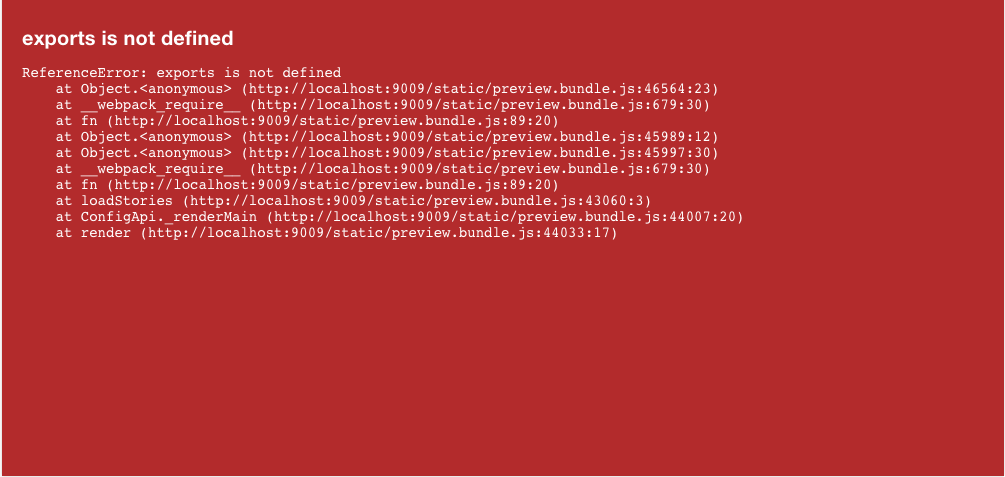
Use npm run storybook, you will find an error as ReferenceError: exports is not defined. This will happen in “storybook”: “^1.0.0” with webpack “2.0 +”. The issue is open discussed in github issue list. The resolution is to add a .babelrc file to set module usage as below.
.babelrc
{
  "presets": [["env", { "modules": false }]]
}
Then re-run npm run storybook, you will see something as below and open the link you can interact with your component
info @storybook/react v3.3.13
info
Failed to load ./.env.
info => Loading custom .babelrc
info => Loading custom webpack config (full-control mode).
 22% building modules 100/109 modules 9 active ...el-runtime/core-js/symbol/iterator.js
[at-loader] Using typescript@2.6.2 from typescript and "tsconfig.json" from /Users/youyue/Projects/Github/react-typescript-npm-storybook-boilerplate/tsconfig.json.

 94% asset optimization                                                       d [at-loader] Checking started in a separate process...

[at-loader] Ok, 1.071 sec.
webpack built 1501b6d031b646f41797 in 8051ms
info Storybook started on => http://localhost:9009/
info
Then you can view and interact your component through the url like this example.
Step 4 - Publish component in NPM
Start from NPM documentation
First you need to follow register an account and acquire the login session in your environment. PS: NPM publish documentation
Add configuration
Then add repositry and prepare script into your package.json. This will ensure your git repo will show in NPM and your library is up-to-date.
package.json
{
  "script": {
    ...
    "prepare": "yarn build",
    ...
  }
  ...
  "repository": {
    "type": "git",
    "url": "git+https://github.com/Airsquire/react-typescript-npm-storybook-boilerplate"
  },
  ...
}
Then you can found your package in NPM and it will be linked to your github repo.
Final Step - Lint, CI/CD, Coverage report, Badge makes world prettier
Lint
Because we are using Typescript for both of development and test case, it is quite straightfoward to use TSLint. PS: TSLint documentation
First add dependencies for linting Typescript with react
yarn add tslint tslint-react --dev
Then add tslint.json as below
tslint.json
{
  "extends": ["tslint:latest", "tslint-react"],
  "rules": {
    "trailing-comma": false,
    "semicolon": false,
    "member-access": false,
    "no-implicit-dependencies": [true, "dev"]
  }
}
Then modify package.json to add lint script
package.json
{
    ...
    "scripts": {
        "build": "rm -rf ./lib && tsc",
        "test": "jest",
        "storybook": "start-storybook -p 9009",
        "lint": "tslint -c tslint.json --project tsconfig.json"
    },
    ...
}
CI/CD
For CI/CD tool we are using Travis CI for our open source project practice.
First following Travis CI documentation to link your github repo.
Then add .travis.yml to your project
.travis.yml
language: node_js

sudo: false

notifications:
  email:
    - youyue@airsquire.co

node_js:
  - 8.0.0

before_install:
  - |
    if ! git diff --name-only $TRAVIS_COMMIT_RANGE | grep -qvE '(\.md$)|(^(docs|examples))/'
    then
      echo "Only docs were updated, stopping build process."
      exit
    fi
    npm install npm@5.x -g
    phantomjs --version
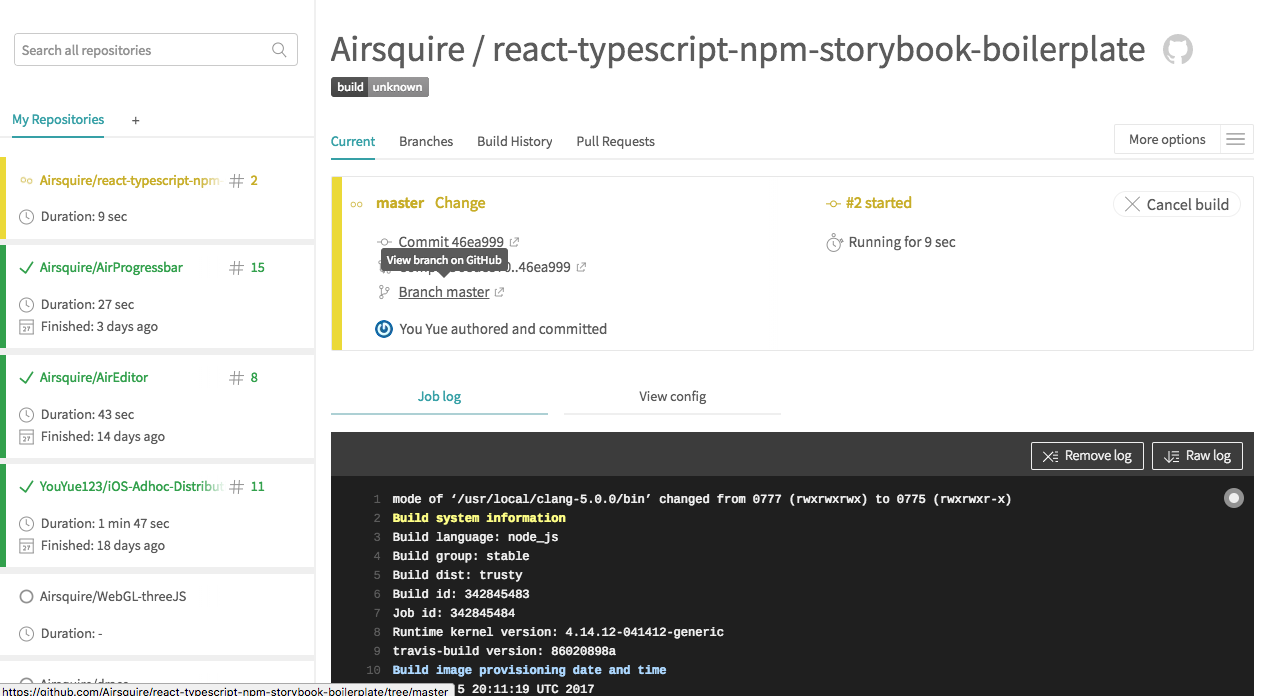
Then push your change to Github, you will find a Continuous Integration job is triggered in Travis CI. And it will run npm test for validation.
Coverage report
In order to manage test coverage report we are using codecov.
First following its documentation to link your Github repo.
Then we need to add dependencies
yarn add codecov --dev
And then we need to modify our test script in package.json. In this way, while it is during the CI period, the code coverage report will also be generated.
package.json
{
    ...
    "scripts": {
        ...
        "test": "jest && codecov",
        ...
    }
    ...
}
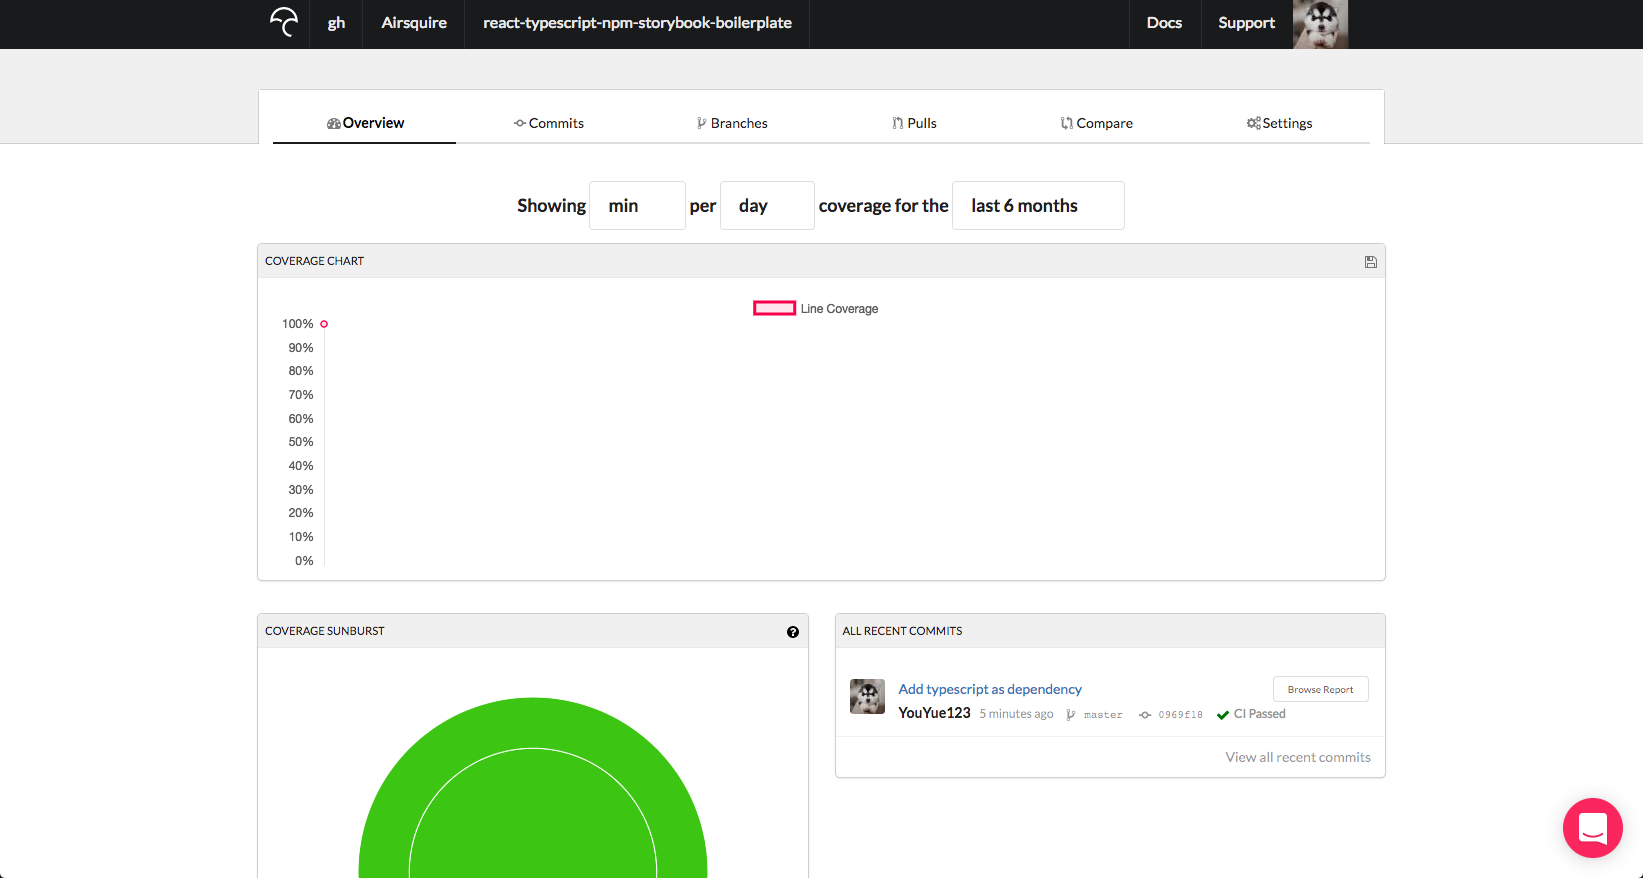
Then push your update to Github, it will update the codecoverage as below.
Badge
After running code coverage and CI/CD building job, we want to have a single place to have up-to-date information. We add them as badges to our github repo ReadMe.
The feature is supported by Shields.io
Sample is as

![]()


I am CTO @ Airsquire. I am living in Netherlands